


 In this article we describe how to create a game station entry card so that a player can enter the game station only once using that card.
A radio-frequency identification (RFID) reader, a few RFID tags, an ARM LPC2138 development board as hardware and Visual Studio 2013 as the software programming tool installed on a PC running Windows OS are used to create this game station entry card software. To limit the scope, this article does not deal with details of the hardware.
Software program For Game Station Entry Card
C# (or C sharp) program is used for coding on Microsoft Visual Studio 2013 environment. The software collects data from an RFID tag/card through an RFID reader and writes it to the COM port that is opened by C# program (a console application). The program can automatically detect any passive RFID tag.

Transmit (TX) pin of the RFID reader is connected to RXD1 (pin 34) of LPC2138 chip (not shown here). When an RFID tag is swiped against the reader, data is first sent to LPC2138 board. A set of four LEDs on the board glows to indicate detection of signals. If the card is swiped again another set of four LEDs will glow to alert the user. Depending on the tag number read by the program, the number of times the card is swiped by a particular player gets displayed on the computer screen.
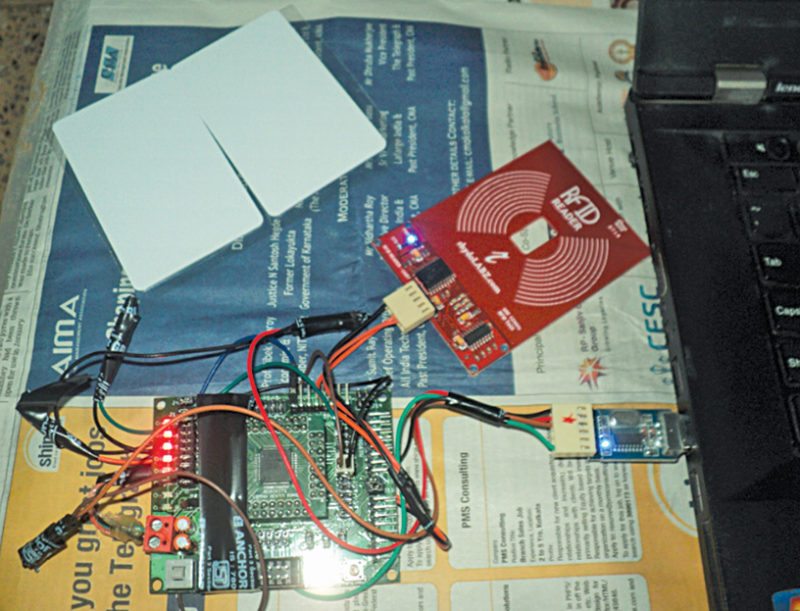
LPC2138 board from Robokit is used here for serial communication and to drive the LEDs for indication. Baud rate of serial communication is set to 9600. Note that, you can use any other board that has a minimum of two UARTs, with first UART interface to a PC and second to an RFID reader. Connect the board to a PC using USB-to-serial converter as shown in Fig. 1. Pin 19 (TXD0) and pin 21 (RXD0) of LPC2138 chip are connected to receive (RX) and transmit (TX) pins of USB-to-serial converter, respectively.


Source code for LPC21XX development board (arm_lpc2138_rfid_0v2) and a test application for the setup generated after building the project, driver software (driver1_ch340 and cp210x_vcp_windows) are included in source code provided at the end of the article.
Designing the software application
1. Open Visual Studio 2013 in administrator mode (if not in said mode by default).
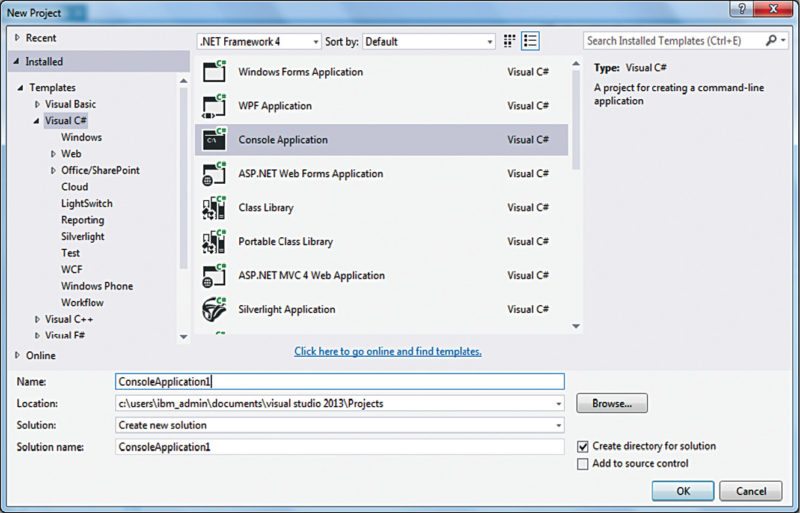
2. Select New Project to create a new application.
3. A dialog box will open. Under Visual C#, choose Console Application as shown in Fig. 2.
4. Provide solution name as ConsoleApplication1, and click OK.
5. Copy and paste the code provided at the end of the article.
6. Save the code, build it and run it.
7. It may give the error message ‘A 64-bit debugging operation is taking longer than expected.’
8. To solve this, right-click on Solution. Go to PropertiesBuild. Change platform target to x86 as shown in Fig. 3.
9. Click on Start Debugging icon to run ConsoleApplication1 again.
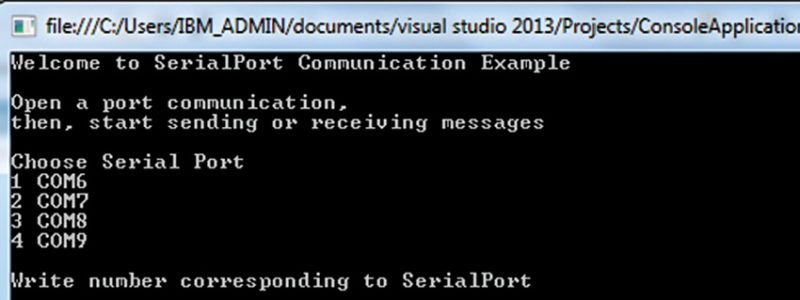
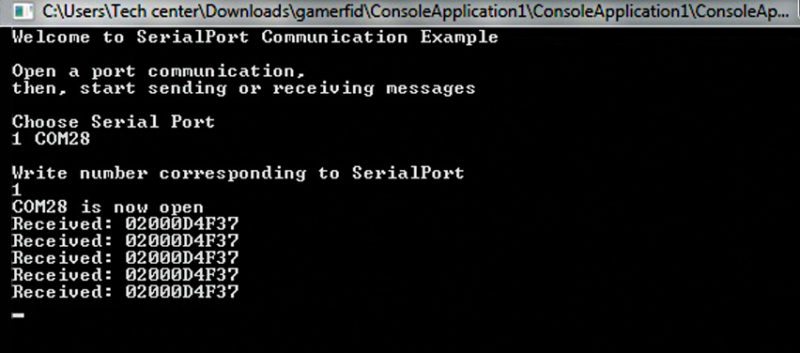
10. Console will be generated as shown in Fig. 4.
Software algorithm For Game Station Entry Card
The program first starts the main sub-routine, stores all available COM port names and writes all available port names in a buffer. Serial port is configured with baud rate of 9600bps, parity as none, 8-bit data and one stop bit. It creates an asynchronous event (it is a secondary thread of the main program) and activates every time a serial device sends data to the computer and then opens the COM port.
The program reads the RFID number from the RFID tag and prints it in Console window on a PC.
Program appends incoming RFID numbers to StringBuilder object and removes Newlines and converts to strings. It adds strings to a list of strings and removes all empty entries. As and when a new RFID number enters the list, the RFID reader sends info to LPC2138 and it counts the number of entries.
Testing For Game Station Entry Card Software
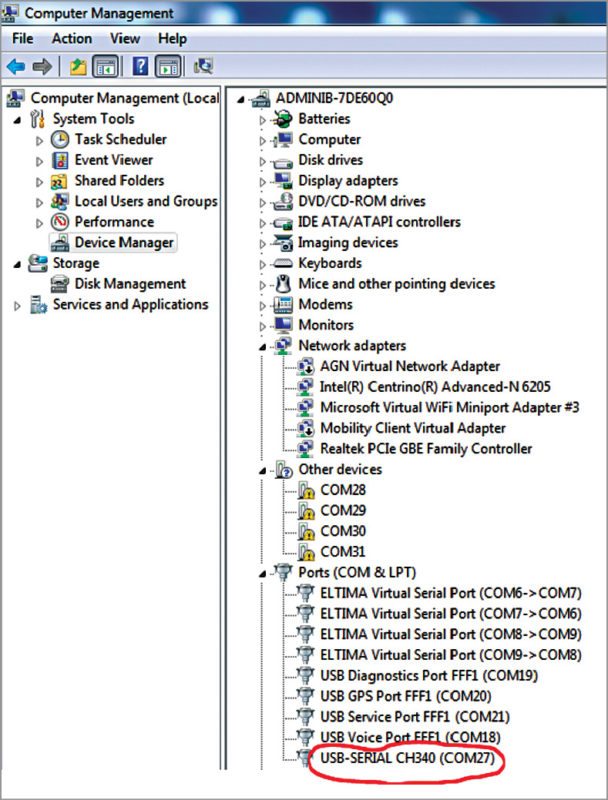
1. Connect RFID reader to a USB port of your system. Check the correct port number from ComputerManageDevice ManagerPorts as shown in Fig. 7.
2. Run ConsoleApplication1 executable file found in bin folder of this project.
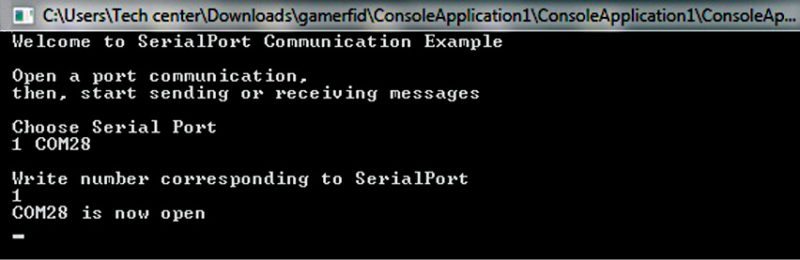
3. Select COM port available on your system. Choose the correct port number.
4. Once the port number is selected, application will open the port. If it fails to open, it will give error message ‘Unable to Open Port.’ If successful, it will display the message ‘COM27 is now open’ (COM27 may be different in your system) as shown in Fig. 5.
5. Once the desired port opens, swipe any passive RFID tag against the RFID reader. When the tag is swiped for the first time, a set of four LEDs on LPC2138 board will light up.
6. If the tag is swiped again, another set of LEDs will light up and the number of times swiped will get displayed on console window of the screen of PC as shown in Fig. 6 to alert the user that the same card has been used earlier.
Download source code: click here
Sohini Mitra is a system engineer at IBM India Pvt Ltd in Kolkata
