


Raspberry Pi is a low-cost, high-performance, credit-card-sized computer designed for learning, problem-solving, and having fun. Easy to get started with, this compact yet powerful computer comes with essential accessories, including a monitor, keyboard, and mouse.
However, imagine the inconvenience of having to transport these accessories between different workplaces to access this tiny computer. Does it still feel tiny?
Table of Contents
The configuration given in this article lets you set up a local network between Raspberry Pi board and a laptop using an Ethernet cable. It is a simple and convenient configuration to access Raspberry Pi remotely.

Things You Need to Get Started
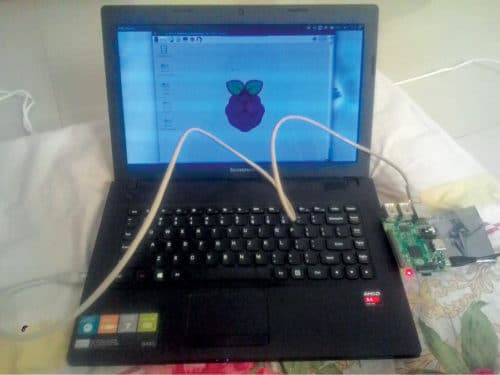
To configure the setup, you will need three components: a Raspberry Pi with an SD card running the Raspbian operating system, a laptop running a Linux OS (I prefer Ubuntu 16.04), and an Ethernet cable to establish a connection between the Raspberry Pi and the laptop (see Fig. 1).
The laptop must have an internet connection to install several software packages. This same connection can be shared with the Raspberry Pi using an Ethernet cable to facilitate package installation.
Installing Required Packages on Ubuntu
Configure Ethernet connection on Ubuntu to share its network with hosts connected to it—in this case, Raspberry Pi. Then, open connection settings for Ethernet connection from desktop.
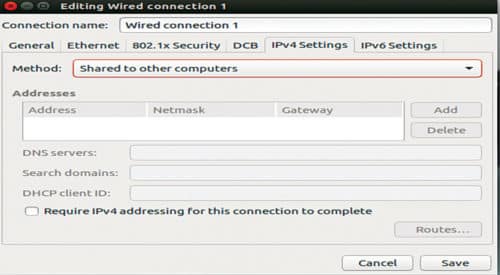
Change IPV4 settings to Share to Other Computers and click on Save. (Fig. 2). An IP address is required to get access to Raspberry Pi over Secure Socket Shell (SSH).
SSH is a network protocol that provides the administrator with a secure way to access a remote computer. SSH service is not enabled by default in Raspberry Pi.
To enable SSH, access command line using sudo raspi-config command). Since there is no monitor or keyboard connected to Raspberry Pi, it is not possible to use $ ifconfig command.
To find out the IP address assigned to Raspberry Pi using a laptop, use nmap tool. Ubuntu needs Internet connectivity over Wi-Fi. To do that, connect it to a known Wi-Fi connection.
Open the terminal and install nmap using the following command:
$ sudo apt-get install nmap
Once the installation is complete, reboot the system. Make sure it is connected to the Internet via Wi-Fi.
Accessing Raspberry Pi Using SSH
Connect Raspberry Pi to the computer with Ubuntu using an Ethernet cable. Then, start Raspberry Pi. By default, the network configuration saved in Raspberry Pi over Ethernet connection is dhcp. This allows Raspberry Pi to get the IP address from Ubuntu system.
It takes some time for Raspberry Pi to boot up and get an IP address. Once it gets an IP address, a pop up on Ubuntu system will display Connection Established.
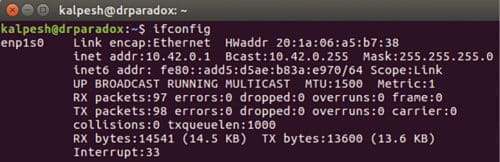
Note down the broadcast address of the Ethernet connection on Ubuntu. Open the terminal and run $ ifconfig command as shown in Fig. 3. Make a note of the IP address of Ubuntu system (10.42.0.1 is the IP address in this example) and look for the term Bcast. This should be in the second line when ifconfig command is given.
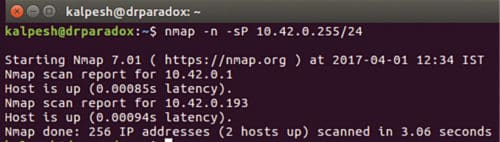
Search for the IP address assigned to Raspberry Pi using $ nmap -n -sP 10.42.0.255/24 command. Replace 10.42.0.255 with Bcast address noted in the previous step. nmap tool shows the details of all hosts that are up and running, along with their IP addresses. Make a note of the IP address (here, it is 10.42.0.193) assigned to Raspberry Pi.
Login to Raspberry Pi using $ ssh -Y [email protected] command. Replace 10.42.0.193 with the IP address noted using nmap tool. Enter default password as raspberry.
This setup allows you to access Raspberry Pi anytime over SSH using the IP address assigned to it, in non-graphical command-line mode. Note that, accessing the graphical desktop requires installing additional packages such as VNC server. This is explained next.
Installing Required Packages on Raspberry Pi
Internet access is available on Raspberry Pi since Ubuntu connected to a Wi-Fi network has shared its connection over Ethernet. Run the following command to update the packages list from the repositories:
$ sudo apt-get update
Graphical desktop of Raspberry Pi can be shared using tightvncserver package. For that, run the following command:
$ sudo apt-get install tightvncserver
Run the following command to perform the initial set up of tightvncserver:
$ tightvncserver
Enter a suitable password for future connections. Enter n for No to view only password.
Run the following command to copy and paste from VNC server:
$ sudo apt-get install autocutsel
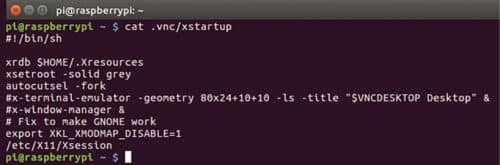
Add autocutsel -fork in /home/pi/.vnc/xstartup using the following command:
$ sudo nano /home/pi/.vnc/xstartup
Save it using Ctrl + x.
Contents of the modified xstartup file can be viewed using the following command:
$ cat .vnc/xstartup
Restart VNC server for autocutsel to take effect, using the following command:
$ vncserver -kill :1 then command $
vncserver :1
Accessing Raspberry Pi Using VNC Viewer
Although Raspberry Pi has the required packages installed to stream its graphical desktop, VNC Viewer is needed to access it. Since we are using an Ubuntu system to access Raspberry Pi, install VNC Viewer using the following command:
$ sudo apt-get install ssvnc
You may need to install xtightvncviewer using the following command:
$ sudo apt-get install xtightvncviewer
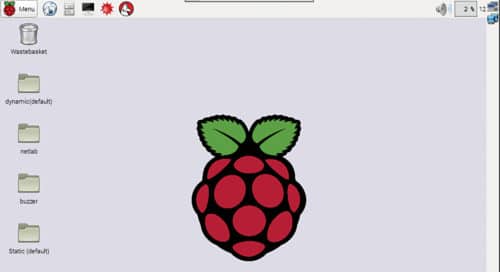
It is now possible to access the graphical desktop of Raspberry Pi using the following command:
$ xtightvncviewer 192.168.0.193:1
Replace 192.168.0.193 with the IP address of your Raspberry Pi. Enter the password to access it. Alternatively, the same results can be obtained using RealVNC Viewer package available on www.realvnc.com
Raspberry Pi can be logged on over SSH using an Ethernet network with Ubuntu system. Graphical desktop of Raspberry Pi running VNC server can be accessed using VNC Viewer. Internet can be accessed on Raspberry Pi by sharing the Wi-Fi connection of Ubuntu system. This configuration lets you access Raspberry Pi from any remote location using a laptop and a regular Ethernet cable.
Note that, vncserver does not start automatically when Raspberry Pi boots up. You need to start it using the command given below. Use SSH every time you want to access the graphical desktop of Raspberry Pi.
$ vncserver :1
Kalpesh Bhosale is B.Tech (electronics), working as embedded software developer at Tata Elxsi Ltd, Pune. He likes exploring open source software and hardware including Raspberry Pi and Arduino