Digital computers store pictures as strings of binary values. The entire picture is divided into a number of pixels—the smallest elements of the picture. The colour and intensity values of each pixel are encoded and stored as a file. Additional information such as width and height of the image, resolution and size is stored along with the image data.
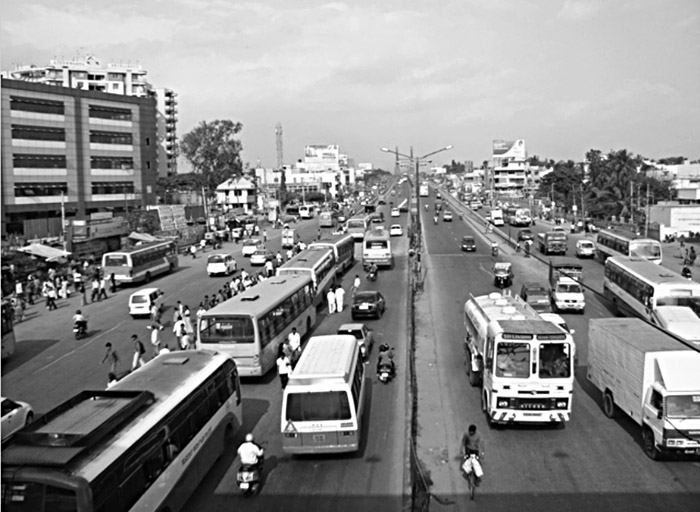
Using this program, a 24-bit bitmap image file can be converted into an 8-bit bitmap file. During this process, the colour information is lost, resulting in a greyscale image.
Bitmap file structure
Bitmap is a common file format used for storing images under Windows operating system. Bitmap files are stored with extension ‘.bmp.’ Hence these are also called ‘BMP files.’
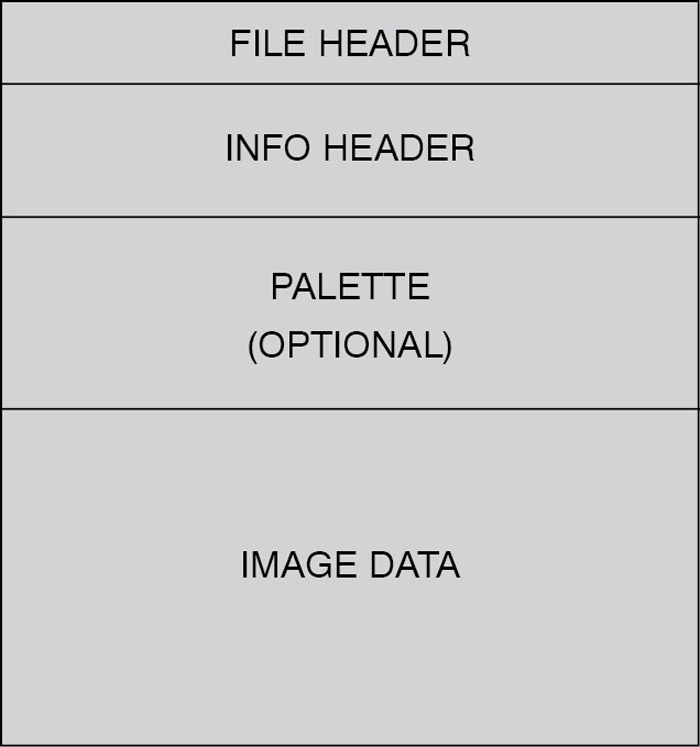
Fig. 1 shows the main sections of a bitmap file. The file header is followed by the information header. If the image is indexed colour, the palette (colour table) follows. The image pixel data forms the last part.
The file header consists of a signature and offset, or starting address of the image data. The information header consists of image parameters like width, height, type of compression and resolution. A 24-bit BMP file usually does not have palette, but for an 8-bit BMP file palette is necessary. Image data contains the values of all pixels one by one.


The number of bits used to represent a pixel is called ‘pixel depth.’ An 8-bit BMP file uses only eight bits to represent a pixel, whereas a 24-bit BMP file uses 24 bits to represent a pixel. In 8-bit representation, the value 00 (hex) corresponds to black, and FF (hex) or 255 corresponds to white. That is, by convention, 0 is normally black and 255 is white. Values in between 0 and 255 represent various shades of grey.
In a 24-bit representation, each pixel is represented by three values corresponding to red, green and blue colours (RGB colour model). For example, FF0000 (hex) represents red, 00FF00 (hex) represents green and 0000FF (hex) represents blue. Around 16.7 million colours can be represented using 24 bits.
RGB-to-greyscale conversion
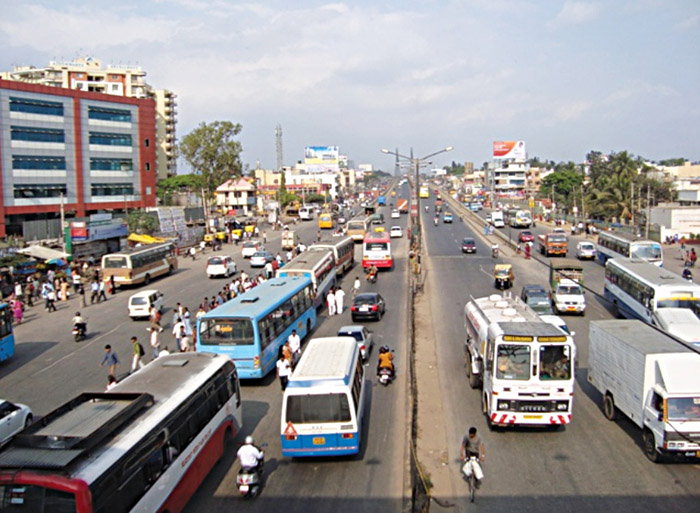
A colour image consists of both colour and intensity information, whereas a greyscale image consists of only the intensity information. The total intensity of a pixel can be estimated by knowing the intensity of each colour in the pixel. To do this, first the RGB values of each pixel are extracted from the image. Then their average is found, which gives the total intensity of that pixel. This process is repeated for all the pixels in the image. Figs 2 and 3 show a 24-bit input file and an 8-bit output file.
Program
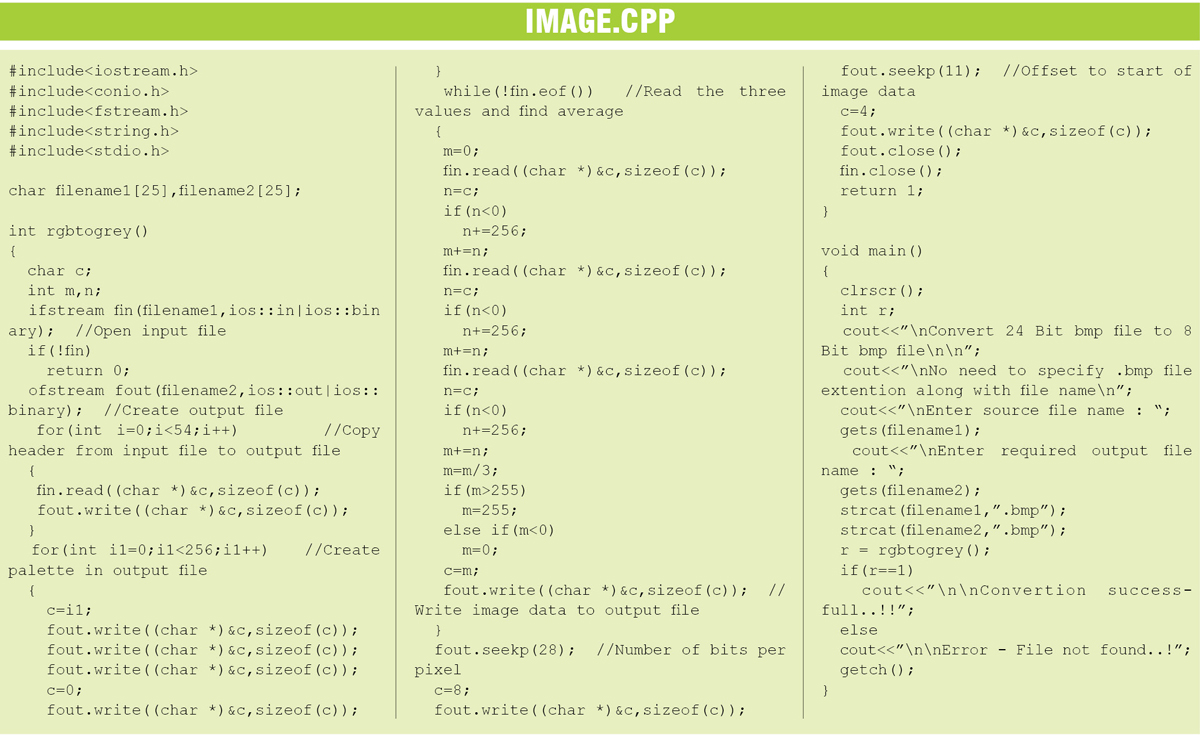
The program (image.CPP) is written in C++ and compiled using Turbo C++. It performs five main functions:
1. Obtain the input and output file names from the user
2. Fetch the input file from the hard disk
3. Read the input file and extract pixel values
4. Find the average value of each pixel
5. Create the output file and modify the header suitably
In a BMP file, the first 54 bytes form the header. In a 24-bit BMP file, the image data begins soon after the header. The values of each pixel can be read in the order of blue, green and red. Each of these can have a value between 0 and 255. The average value is found as (R+G+B)/3. The process is repeated for all the pixels. This forms the new image data.
To create the output file, first the 54-byte header is copied from the input. The value of the number of bits per pixel located at offset 28 in the header is changed to 8. Then the palette is created and appended to the output file. Each entry in the palette consists of four values. Of these, three values correspond to blue, green and red, respectively, and the fourth is always zero. 256 entries are made in the palette. Now the image data obtained by taking the average of colour information is appended to the output file. The value of offset to the start of the image (10 in the header) is also replaced with a new value. Now the output file is ready and can be viewed using any image viewer software.
Testing
Compile the source code using a C++ compiler and create an executable file. Place the executable file in the same folder as the input file. Run the executable file. Enter the input and output file names. Make sure that both the file names are different. Also, the file name should have less than eight characters and the file extension should not be specified. The output file will be created in the same folder.

Most digital cameras store photos in JPEG format. To convert it into BMP, first open it in MS Paint. Then go to File menu and click ‘Save As’ option. Change ‘Save As Type’ option to 24-bit bitmap and click ‘Ok’ button.
Download Source code: click here
The author is a B.Tech in electronics & communications and a hobbyist designer of electronic circuits, software and websites


Dear Sirs,
the link for the source code seems to be broken.
Please can you fix this?
Regards
Mitsos
Hi, we have updated the source code file. You can download now.