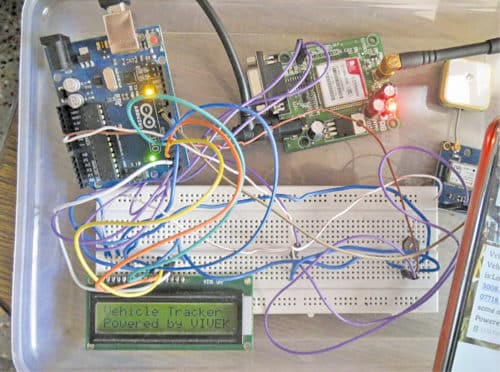
 Presented here is an Arduino-based vehicle tracking system using global positioning system (GPS) and global system for mobile communication (GSM) modules. GSM modem with a SIM card used here uses the communication technique of a regular cellphone. The system can be installed or hidden in your vehicle at a suitable location. After installing this circuit, you can easily track your stolen vehicle using a mobile phone. The author’s prototype is shown in Fig. 1.

Circuit and working
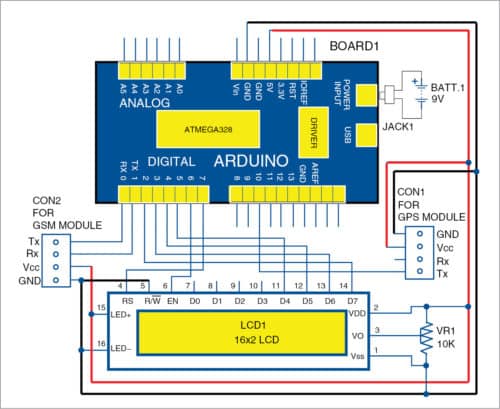
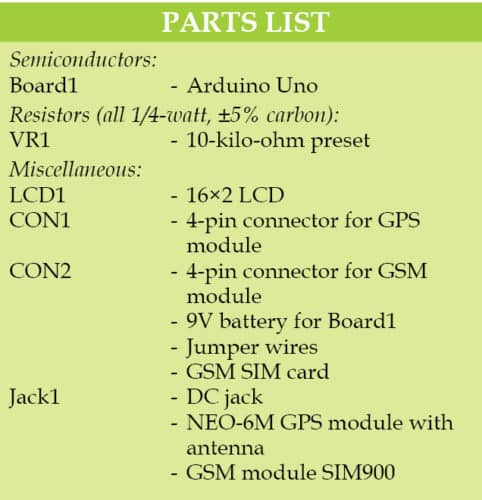
Circuit diagram of the GPS- and GSM-based vehicle tracking system is shown in Fig. 2. It is built around Arduino Uno board (BOARD1), 16×2 LCD (LCD1), GPS module, GSM module and a potmeter (VR1). Working of the circuit is very simple. To operate the circuit, you need to follow the steps given below:

1. First, install Arduino IDE 1.8.3 in your PC. Add GPRS_Shield_Arduino’s header file into the library of Arduino IDE. Download the file from the link.
2. Include or add the user’s mobile number (on which you want to receive the GPS location messages) in the source code (vehicle_code.ino). Compile and upload the code onto the Arduino board using Arduino IDE
3. Once the code is burnt, make connections as shown in the circuit diagram.
4. Insert a valid SIM card in the GSM module connected with the Arduino board. Make sure that this SIM has necessary balance to send alert messages to the user’s mobile phone.
Construction and testing
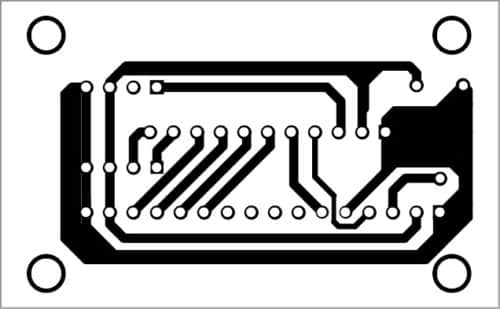
An actual-size PCB layout of GPS- and GSM-based vehicle tracking system is shown in Fig. 3 and its components layout in Fig. 4.


Download PCB and component layout PDFs: click here
Once you are done with connections and uploading of the code, place the system (Arduino, LCD, GPS and GSM with SIM card) in the vehicle. Now it’s time to track the SIM card inserted in the GSM module. To track the SIM card, send an SMS to the mobile number of the SIM card by typing “Track Vehicle” from your (user) mobile phone.
After sending the message, wait for a few seconds until you receive location detail of the SIM card in the form of latitude and longitude values on LCD1 as well as in your mobile phone. Vary preset VR1 till you get clear visible text on the LCD1. After getting the latitude and longitude position (in decimal format), convert the first four digits of these values into degrees and minutes like 28°38’ and 77°13’. Enter these values in the search box of Google Maps and then click “Search” button to find the exact location.

Applications
The system can be used by individual vehicle owners as well as organisations to locate and track their vehicles. Organisations can use it to track the status of their product delivery by trucks at all times. It also helps owners to keep tab on their driver, preventing vehicle abuse and thus resulting in significant cost-savings. The system can be easily installed in any vehicle such as cars, boats and motorbikes.


Please provide the link to file vehicle_code.ino as mentioned in Point 2 of article.
Without this nothing works ! Following are lines from article.
( 2. Include or add the user’s mobile number (on which you want to receive the GPS location messages) in the source code (vehicle_code.ino). Compile and upload the code onto the Arduino board using Arduino IDE )
Clearly thee is no link mentioned for the file name vehicle_code.ino
Please add the link and some detail how to use it. Alternatively, please mention where to get it.
Can u send me the prototype..plz..I want to see the connections
i am in second year of entc . I followed your procedure but after lcd is showing gps initalization -no gps range found. will you please guide me .
The author Vivek Kamboj replies: It seems your GPS is not getting signal from the satellite. You need to place your GPS module outdoor (on the roof or near the window) and moreover check that the GPS module is getting power supply from the DC adaptor.
Where did you attach the code?
I can’t found the link to download, pls let you know
This project does not require any source code.
So what should we burn in aurdino there must ne somethin code right
vehicle.ino is not available
Please download the code from here: https://efy.efymag.com/admin/issuepdf/Vehicle%20tracking%20system%20based%20on%20gps%20and%20gsm.zip
Hi there! Just one general question: any particular reason(s) why you are using GSM instead of UMTS or LTE? – I’m just wondering if GSM is normally/currently the technology of choice for Vehicle Tracking Systems and why… Thanks in advance!
Many modern vehicle tracking devices combine both active and passive tracking abilities: when a cellular network is available and a tracking device is connected it transmits data to a server; when a network is not available the device stores data in internal memory and will transmit stored data to the server later when the network becomes available again.
How much can it cost approximately
i would try to interface the sim800L gsm module to arduino UNo but the signal was not available and i tried with 4 gsm modules the signal was not available and i used strip Antenna, GSM Antenna and i also resistors connections also still it was not working please help to to get signal for this modules thank you
What about cost
Hi, I am getting everything except the values latitude and longitude.it is just showing lat: and log: .what should I do now. Is there any logical error in program?
Very good project.
Thank you for your feedback.
Sir, can I provide 12V input to the Arduino board instead of 9V?
Yes, You can use 12V inplace of 9V.