 This simple telephone caller identification display can be very useful for bikers. While riding a bike or any two-wheeler, the cellphone is usually kept in a pocket. When you receive a phone call on your cellphone, you do not know who is calling unless you look at the screen. And sometimes you may not even hear the incoming ringtone. In this project, when someone calls you on your cellphone, the caller’s number can be seen on the display attached to your vehicle.
Circuit and working
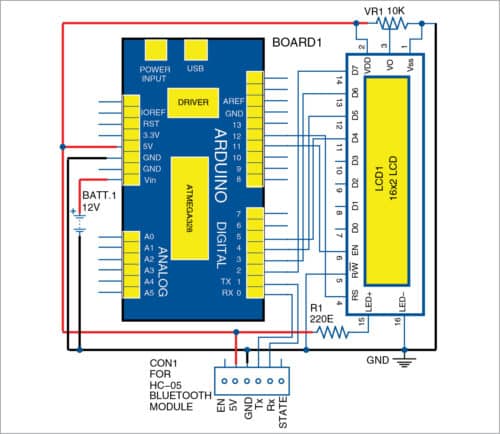
The circuit diagram of the wireless caller ID for bikers is shown in Fig. 1.

It is built around Arduino Uno (Board1), 16×2 alphanumeric LCD (LCD1), HC-05 Bluetooth module and 12V battery. The circuit works with a 12V or 5V regulated power supply. The microcontroller (MCU) in Arduino requires 5V but the bike or motorcycle is already connected to a 12V battery.
Bluetooth module used in this project, HC-05, supports master and slave mode serial communication (9600bps – 115200bps) SPP and UART interfaces. Using these features, it can communicate with other Bluetooth-enabled devices like Android smartphones. The module runs on 3.3V to 5V power supply.
The 16×2 LCD is used to display message as soon as the bike’s engine starts. Pins 3, 4, 5 and 6 of the LCD are the control lines connected to 10-kilo-ohm preset (VR1), pin 12, GND and pin 11 of Arduino, respectively. Data pins 11, 12, 13 and 14 of the LCD are connected to pins 5, 4, 3 and 2 of Arduino, respectively. Preset is used to adjust the contrast of the LCD.
Software for the wireless caller ID display is written in Arduino programming language. Arduino Uno is programmed using Arduino IDE. Select the correct board from Board> Tools menu in Arduino IDE. Select the correct COM port before uploading the program (caller_id.ino) through the standard USB port in the computer.
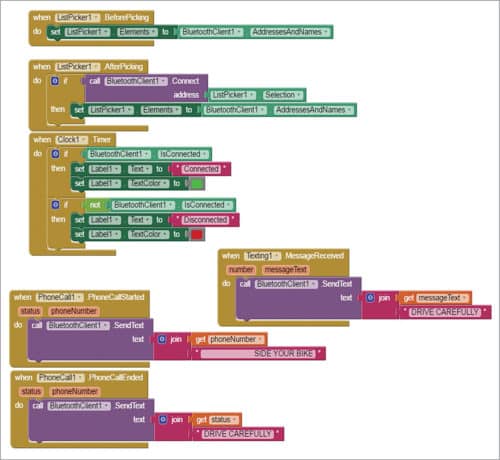
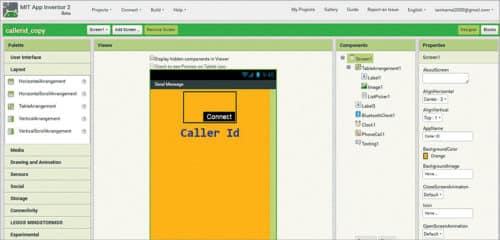
This project includes an Android application developed on MIT App Inventor platform. Block diagram of the app is shown in Fig. 2 and its home screen is shown in Fig. 3. Export this app as callerid.apk file, or with any other suitable file name. Install callerid.apk file on your smartphone. Note that this Android app is not available on Google Play Store.


Testing
Connect the LCD and Bluetooth module as shown in the circuit. Enclose the circuit properly in a suitable cabinet. Fix it near dashboard of your bike and power up the system.
To set up the caller ID system fitted near the dashboard of your bike, pair the Bluetooth device (HC-05) with your smartphone’s Bluetooth. Then, open the callerid app and click on Connect to pair with the Bluetooth of the app. Make sure the Bluetooth module is connected to your smartphone’s Bluetooth; else, it will not display any incoming call on the LCD.
You can now keep your smartphone in your pocket and drive safely. The LCD will show “Drive carefully” message when there is no incoming call.
Download source folder
Kamal Das is an electronics hobbyist


Can I order y=this project. Also mention what is the price.
Pls I want to use this as my final year project work but the report write up will be my problem,So I need your help to write the report