 Using this wireless extender, you can control your IR-remote-controlled home appliances like DVD player and air-conditioner from another room without the hassle of running extra cables between the two rooms. The system wirelessly sends infrared signals from one room to another.
Wireless extender circuit
The system is a combination of an infrared transmitter unit and a receiver unit. Both are housed in separate small plastic boxes. Keep the transmitter unit in the room where you are sitting with the remote control of the appliance to be controlled (say, a DVD player), while the receiver unit has to be kept on or nearby the DVD player in another room. The transmitter detects the IR pulses from your remote and retransmits on the UHF band at 433 MHz.
The receiver unit (in another room) picks up the transmitted signals, detects and demodulates them with the 38kHz ultrasonic carrier used by IR remote systems. IR pulses from a pair of IR LEDs (IR LED1 and IR LED2) provide controlling signals to the DVD player located in the other room.
Transmitter section
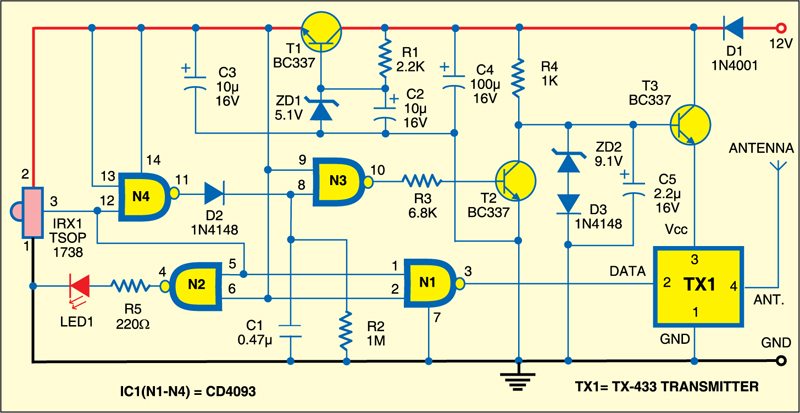
Above is the transmitter circuit. The codes from the remote control are picked up by the IR receiver module (TSOP1738). The detected control codes pass through gates N4 and N1 of IC CD4093 (IC1) to the data input of UHF transmitter module (TX1), which transmits them to the receiver. Gate N2 drives LED1 to give a visual indication when TSOP1738 receives pulses from the IR remote control.

The combination of Zener diode ZD1 and transistor T1 (with R1, C2 and C3) provides regulated 5V DC from the unregulated 12V input. This 5V supply is used for the IR receiver module and quad Schmitt gate CD4093 (IC1). Diode D1 provides reverse-polarity protection, while capacitor C4 provides additional smoothing and acts as a reservoir.
The regulated 9V transmitter module (TX1) supply is arranged such that it enables the transmitter module only when IR remote code pulses need to be transmitted. It is achieved through the combination of transistor T3 and Zener diode ZD2 with its series diode D3.
Receiver section
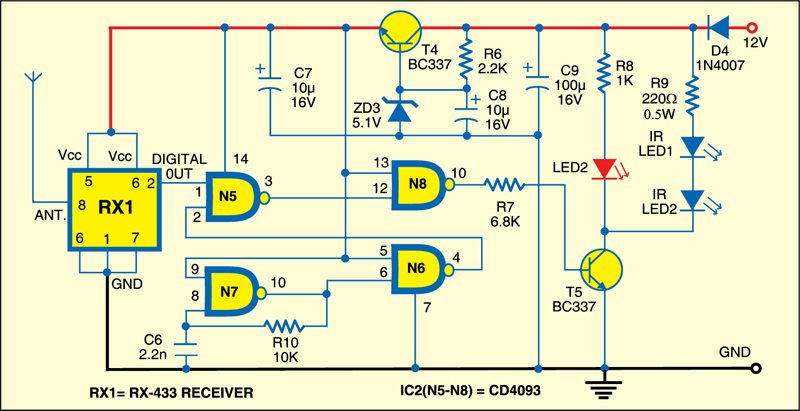
Shown below is the receiver circuit. A regulator built around transistor T4 and Zener diode ZD3 provides regulated 5V DC to the receiver module (RX1) and CD4093 quad Schmitt NAND gate (IC2).

When the receiver module detects a signal from the transmitter, it outputs the code pulses to pin 1 of gate 1. The 38kHz pulses generated by the oscillator formed by gate N7, C6 and R10 are fed to pin 2 of gate N5. The pulse output at pin 3 of gate N5 is remodulated with the 38kHz subcarrier to provide noise immunity in IR remote control systems.
These 38kHz tone bursts are then fed through buffer inverting gate N8 to transistor T5 via base resistor R7. Thus T5 is driven at a 38kHz rate for each of the received code pulses. The IR transmitting LEDs (IR LED1 and IR LED2) produce the regenerated IR control pulses for your DVD player. At the same time, LED2 flashes to indicate reception of the transmitted signal. Diode D4 prevents damage due to an accidental reverse-polarity connection of the plug-pack supply, while C9 provides additional smoothing.
Both the transmitter and receiver units are designed to run from an adaptor or any other convenient 12V DC source.

Construction & testing
Assemble both the units on separate general-purpose PCBs and enclose in suitable plastic cabinets. Refer Fig. 3 for the pin details of the transmitter and receiver. After completing the assembly, solder an antenna at an appropriate place on each of the PCBs.
Before installation, check the transmitter and receiver for proper working. To check the transmitter unit, supply power via its plug-pack. LED1 may blink very briefly when the power is applied, but then it should go off until you point your remote to its front window and press one of its buttons. LED1 of the transmitter unit should blink to confirm that the transmitter is receiving the signal from the IR remote.
To check the working of the receiver, assume that the transmitter is working well. Now power-on the receiver as well. Then with the transmitter and receiver units a metre or two apart (but not facing each other), point your remote to the front of the transmitter again—this time watching the front of the receiver. The LED2 of the receiver should blink, indicating that the receiver is receiving the codes correctly.
The project was first published in May 2011 and has recently been updated.


Many thanks, I made it!! and Works like a charm
but my receiver side LED blinking even transmitter not plugged to power
any way, this project so rare and i appreciate.
i suggest design a new model over blutooth
I made this circuit but the receiver section not working. The Led glow when touch any components only. Also there is mistake in Rx 433 connection. Pin no 6 connected to Vcc & Gnd. How it possible? May be pin no 6 is for ground & pin No 5 & 4 for Vcc. Please clarify.
Please confirm Printed circuit for this circuit is avilable to buy.
Hi! I Made the circuits but one or both are not working. I’m testing with a TV and its remote. The receiver led and ir led flash when i press a button but the signal sended to the TV must be wrong because nothing happens. Any suggestion?
There are commonly two types of TV remotes, but not limited to, available in the market. They are RC5 and NEC format. Some other formats are RC6, RECS-80, SIRS, etc. Please try with other remote controls.