


 This wireless LCD display shows information sent from a smartphone. The user can send text messages with up to 32 alphanumeric characters to the LCD within Bluetooth range of about 10 metres.
This project can be extended and implemented in many ways for:
1. Educational organisations (schools and colleges). To inform any changes in the timetable or important information

2. Hospitals. To inform a doctor’s name and her or his department
3. Restaurants. To inform the kitchen staff
4. Offices. To inform the status (busy, available, out of the office, etc) of the boss inside the office
Circuit and working
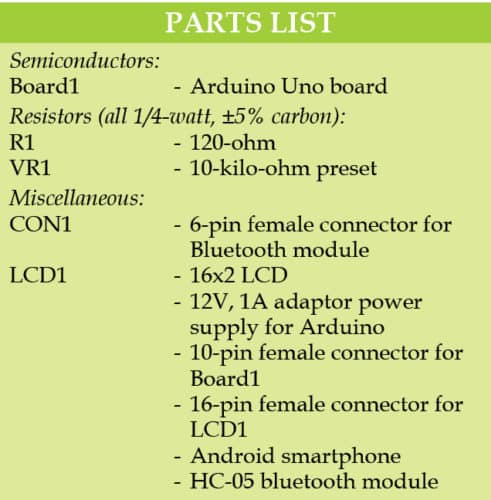
Circuit diagram of the wireless LCD display via Bluetooth is shown in Fig. 1. It is built around Arduino Uno board along with a 16×2 alphanumeric LCD (LCD1), Bluetooth module (HC-05) and a preset (VR1).
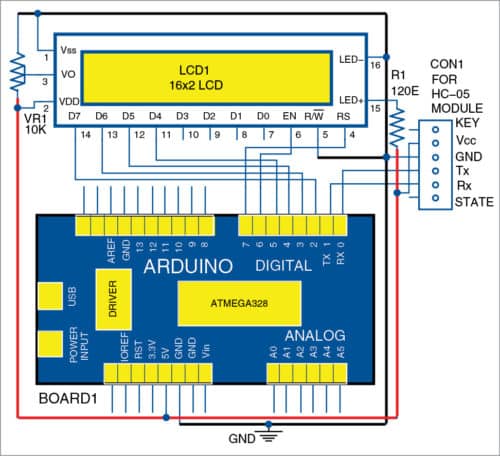
HC-05 Bluetooth module has six pins out of which four (Vcc, GND, Rx and Tx) are used in this project. Power supply for the circuit can be from an adaptor (12V, 1A) or USB.
Software
Arduino IDE is used for programming Arduino board. LCD’s library (#include ) is used, which is already available in the latest IDE’s library. Here, the baud rate or speed of serial communication is set to 9600. For serial communication, inbuilt functions such as serial.begin(), serial.available() and serial.readString() are used.
Download source folder
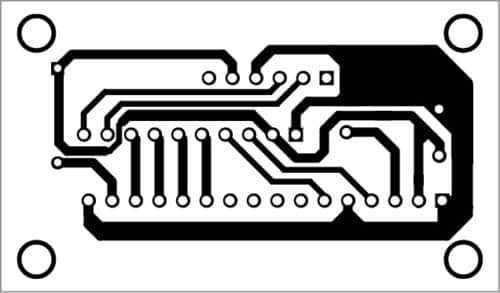
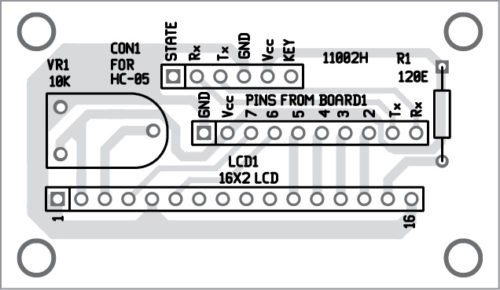
Construction and testing
The PCB layout for the wireless LCD display is shown in Fig. 2 and its components layout in Fig. 3. After connecting the circuit on the PCB, follow the steps given below to test the project:
Download PCB and component layout PDFs: click here
1. Download Android app called Bluetooth Terminal by Juan Sebastian Ochoa Zambrano from Play Store. Install it on your smartphone.
2. Open Arduino IDE. Select COM port from your computer’s Device Manager. Set baud rate to 9600. Compile and upload the code (LCD.ino) to Arduino board.
3. Connect the 12V power supply to the Arduino board. The LED in HC-05 Bluetooth module will blink continuously. This means Bluetooth module is working fine. The LCD will display ‘Welcome’ message. If not, adjust the preset by varying VR1 till you get clear text on LCD1.
4. Pair HC-05 module with your smartphone’s Bluetooth using 1234 as password. After getting paired, the LED on HC-05 module will blink intermittently instead of blinking continuously.
5. Open Bluetooth Terminal and pair it with HC-05 module. You will see ‘Connected’ on the app. Type a message and press Send. The message will get displayed on LCD1.
Hello, please concerning this project you posted, if I wish to used a graphical liquid Crystal display (GLCD) instead of 16*2 LCD. How am I go to do the connection, please I need a quick respond on this.
contact me ,and mail your requirement via mail [email protected]
Nice explanation