


In today’s world, we live in a pool of electronic instruments and gadgets that we use in our daily life extensively. In the case of minor issues with these instruments, you need not have to be an electronics expert or call an electrician to resolve it. With a simple multimeter, you can be an expert yourself.
Multimeters, also known as daily life meters are excellent measuring tool, which can measure current, voltage and resistance. With the values of these three parameters in hand, any electrical problems can be easily fixed. Some multimeters can be used for continuity check and diode check, which helps in solving most of the electronic issues. A multimeter is a simple tool but saves a lot of money and time and makes work a lot easier.
NOTE: The voltage ratings mentioned are with respect to the USA where electrical outlets are 120volts and heavy duty appliance circuits (electric stoves, clothes dryers) use 230 volts. In many other parts of the world the standard voltage in household electrical systems is 230 to 240 volts. Adjust the expected readings according to the normal voltage provided in your local.)

Following are the 10 problems that can be easily solved using a multimeter.
When you are doubtful about an Electrical Outlet
A multimeter can easily check if there is power output from an outlet or if needs to be replaced. All one has to do is set the meter to 400V AC and place the probes at the following combinations and check for the respective readings.
| Probe 1 | Probe 2 | Output voltage |
| Hot | Neutral | 120V |
| Hot | Ground | 120V |
| Neutral | Ground | Zero |
When your Car is too lazy to start
A morning when you start your car, the motors run too slow or it doesn’t start at all. The first thing to doubt on will be the car battery. 
The easiest thing you can do is pick up a multimeter, set it to 15V DC or more. Turn the vehicle’s light and ignition off. Touch the meter probes to the terminal posts on the car battery. The readings are as follows:
| Voltage Readings | State of Charge |
| 12.6V | 100% |
| 12.45V | 75% |
| 12.24V | 50% |
| 12.06V | 25% |
| 11.89V | 0% |
NOTE: these readings are at 80 degrees F. Battery voltage readings will drop with temperature roughly 0.01 volts for every 10 degrees F.)
(At 30 degrees F. a fully charged battery will measure about 12.588 volts, and at zero degrees F it will measure about 12.516 volts.)
If your battery voltage is less than 12.45 volts (75 percent charged), it is low and should be recharged. This can be done by connecting a portable battery charger to your battery, or by driving your car for 15 to 20 minutes at 40 mph or faster.More detailed explanation can be found on how to test your car battery
A lot of batteries lying around but don’t know which one is still alive
One can test common household batteries with a multimeter to check if it is dead. For this, the selector should be set for proper range on the DC scale. Household batteries like AA and AAA are rated at 1.5-volts, so select a 4-volt range on the DC scale for common batteries. If testing a 9-volt battery, then move the selector to the 40-volt range.
Touch each end of the battery with a probe. If the red and black wires are reversed, then a minus (-) sign will appear in front of the numbers. A 1.5-volt battery is “dead” if it registers 1-volt or less. If a device does not work, but the 1.5-volt battery registers (for example) 1.38-volts, then the issue is with the device. A 9-volt battery is “dead” when it fails to read about 7.5 to 8-volts.
When lamps leave you in dark
There are two possibilities if a bulb doesn’t glow. One might be when the light bulb burns out other would be the problem with the lamp. This can be found out by two tests. First, set the multimeter to measure resistance in ohms. If there is more than one resistance setting, choose the most sensitive one. Set the meter to the 400 volt AC selection. Touch one probe to the side of the bulb socket. Touch the other to the tip at the bottom of the socket.
The meter should read about 120 volts. Sometimes, expected voltage in the bulb socket and also the bulb are good, but the lamp still might not light. If the socket is older, the contact tip at the bottom of the socket may have lost its springiness and it may not make dependable contact with the centre tip of the bulb. Use a popsicle stick or screwdriver to lift the tip. Then screw the bulb into the lamp socket and it should work.
NOTE: This test will not work with the compact fluorescent bulbs and with fluorescent tubes because they do not have a continuous conductor running through them, like an incandescent light bulb.
To check the fuse
From household gadgets to automobiles almost all electronic instruments use fuses. If such devices are not working first thing should be to check the fuse before calling for an electrician. First thing here would be to turn off the device, remove the power and then remove the fuse. Set the multimeter to CONT. (continuity) and do the continuity test by putting the positive and negative leads on either side of the fuse and check the reading. If the meter beeps there are continuity and the fuse works, if no sound then it means that the fuse is bad.
When air conditioner quits the job
It might be during the worst weather conditions your AC fails to work. Spending a muggy night is the last thing you would want to do. Some small multimeter tricks would help you find out what actually went wrong, can you fix it yourself or is there a need to call an electrician.
Initial checks
Air conditioning system may have more than one set of fuses protecting it. There may be a set of circuit breakers in your main electrical panel. Check to see that the circuit breaker toggles have not moved to the “off” position due to a sudden overload. If it is still in “on” yet the Ac is not working, then shut off all power to the air conditioner. Turn the air conditioner thermostat to the “off” position also turn off the power at the breaker box too. First check the fuses for continuity, if the fuses are fine, then discharge the capacitor by running the metal tip of a screwdriver between the two terminals to rid the capacitor of any electrical charge. There may be a spark when this happens.
Checking the capacitor
Disconnect the wires of the capacitor using needle nose pliers. Set your multimeter to read Ohms or resistance, on the highest setting your meter has. This is done by turning the dial on the multimeter to the setting labeled “cap” or that has the ohms icon on it. Place the black lead in the hole marked “com,” and the red lead into the hole that says cap or ohms icon by it. Place one lead on each of the capacitor’s terminals and see what reading you get.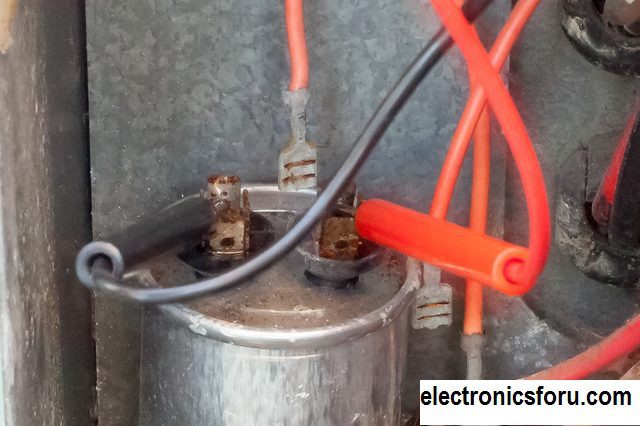
This reading should be within 6 percent of your particular capacitor’s rating. If it is not, then your capacitor is faulty and must be replaced with a new one. If that’s not the problem locate the box that contains the fuses and Do the continuity test. Detailed explanation can be found on how to check an air conditioner
To fix Laptops
The power supply is a critical component in your computer manages all of the power required to run each component of your computer. When this begins to fail, your computer may power off unexpectedly, experience startup warnings or overheat. Several simple checks with a digital multimeter can uncover some of the warning signs of impending hardware failure. Unplug your computer and disconnect all of the cables connected to your computer. If your unit is equipped with a power switch, turn the power supply off.
Precautions
Place your computer on the anti-static mat. This step will prevent your computer from being damaged by static electricity. Remove the screws that hold the sides of your computer in place and remove the outer casing. Unplug all of the power connectors from all of the internal devices. Check the sticker on the power supply and locate the voltage information. The voltage will be different depending on the wattage of your power supply, note down the listed voltage of the power supply.
Set the multimeter
Plug the electrical cord into the power supply while it remains on the antistatic mat. If your power supply has an on/off switch, turn the power supply on. Switch your multimeter to the range that is appropriate for reading the voltage from your power supply. If your power supply’s voltage is 125 volts, switch multimeter to read a range of 100-200 volts.
Checking the power supply
Locate the largest group of wires coming out of the power supply. This bundle is the group of wires that delivers power to the motherboard and not individual peripherals. Connect the multimeter’s negative (black) probe to the ground wired pin which will be the black one. Connect the positive (red) probe to the power line. The power line is recognisable because it is always the green line. Record the voltage that appears on your multimeter. If your power supply sticker shows a voltage of 135 volts, you should be seeing the same reading on the multimeter.
If you see a much lower or higher reading, your power supply has malfunctioned and it will need to be replaced. Turn off the power supply after you have finished testing the ground wired pin and the power line. Reconnect all of the power connectors, replace the sides and restart the computer.
Check which is a hot wire and a neutral wire
Use a pair of protective rubber gloves before testing to find out which black wire is hot. You may accidentally touch a hot wire and get an electric shock. Set your multimeter to measure voltage. Voltage is the pressure of electricity flowing through a wire, and a hot black wire carries the voltage. Place multimeter’s red probe on the bare metal on the end of one of the wires. The positive probe on a multimeter is red, and the black probe is negative. Place the prong of the multimeter’s black wire on the bare metal on the end of a white wire, then read the meter. If you get a reading, the black wire is hot; if you don’t, the black wire isn’t hot.
Repeat the test on the other black wire to test if it’s hot. If you get a reading, the black wire is hot; if you don’t get a reading, the wire isn’t hot.
When washing machine ceases to work
The first thing to check would be the motors. For this, disconnect the washing machine from its electrical and disassemble the shell. Locate the two wire leads that connect to the motor housing and remove them by unplugging them from the motor. Turn the dial on your multimeter or select the appropriate button for the RX1 setting on your multimeter. This tests resistance. Place one probe from your multimeter onto each of the metal tabs on the motor that were exposed by unplugging the wires.
The multimeter should show a “0” or very low number. If it does, the motor coils are functional. If it shows a high number or it shows “infinite,” it indicates the motor is defective.
Remove one probe from the electrical terminal and place it on the shell of the motor to test the ground. If the meter reflects anything other than zero, this means that the motor is not grounded properly. Once you complete this test, reverse the probes on the motor and test the other lug on the electrical terminal.
The trouble with the water heater
Checking your water heater power is the first thing you should do if you have an electric hot water heater problem. Most residential electric water heaters use 240 volts but it is better to confirm the voltage rating on the label. Shut down all the breakers before removing the access panels. Remove the access panels, as well as any insulation or plastic safety covers.
Check if the reset button has tripped off, if it has, then simply resetting it should restore normal functioning of your water heater.
Checking the power supply
Use a small flat head screwdriver to set the upper thermostat to its highest temperature setting. Set the lower thermostat to its lowest setting. Turn the power supply to the water heater back on. Connect the two probes of the multimeter to the two wires above the reset button. Turn on the meter and switch it to a voltage measuring mode if you are using a multimeter, which can also measure current. If you connect the black probe to the black wire and the red probe to the red wire, then the reading on the voltmeter should be around 240 volts. If you connect the probes to the wires in the wrong order, then the reading will be negative. If the voltage reads close to zero, then there is a problem with the power supply to the water heater. Check the wiring, as one of the wires connecting the water heater to the property’s main power circuit, may need to be replaced.
Checking the upper thermostat
Connect the multimeter probes to the upper element contact screws. If the meter reading is close to zero, then the upper thermostat is faulty. It is now time to test the lower thermostat. Use the screwdriver again to set the upper thermostat to the lowest temperature. You should hear a click as the upper thermostat turns off the upper heating element. Set the lower thermostat to the maximum temperature.
Checking the lower thermostat
Connect the probes to the lower thermostat contact screws and read the meter display. The reading should be roughly 120 volts. If the reading is zero or almost zero, then the lower thermostat is faulty and needs to be replaced. Detailed procedure can be found on how to test water heater thermostat
Note: It is a huge amount of electricity which might even kill. So, take extra care while dealing with such high power devices.


I bought a new multimeter…it is capable of reading 230VAC/110VAC, 50Hz supply…..but it is not reading 1VAC,5KHz supply….can u explain me why?? (I want to measure voltage only.)